Setting Up a Raspberry Pi as a KVM Over IP with PiKVM
Setting up a KVM over IP used to mean shelling out $500–$2,000 for a commercial device from someone like ATEN or Raritan. With PiKVM, you can build the same thing — sometimes for under $100 — using a Raspberry Pi, an HDMI capture device, and some free software. This post walks through two approaches: buying a pre-built PiKVM V4 unit, and building a DIY version from scratch. As described by https://docs.pikvm.org/
What we're building
- PiKVM over IP — a device that captures HDMI video, emulates keyboard/mouse via USB, and serves a full remote desktop experience through a web browser
- Two hardware paths — PiKVM V4 Plus/Mini (pre-built, plug-and-play) or DIY V2 (Raspberry Pi 4 + capture components)
- Remote access — control the target machine from anywhere on your network (or via VPN/Tailscale from anywhere in the world)
Why you'd want this
A KVM over IP is fundamentally different from software remote desktop tools like RDP, VNC, or SSH:
| Capability | Software Remote Desktop | KVM Over IP |
|---|---|---|
| BIOS/UEFI access | ✖ | ✔ |
| OS reinstall | ✖ | ✔ |
| Crash recovery | ✖ | ✔ |
| Works with any OS | ✖ | ✔ |
| Pre-boot network boot | ✖ | ✔ |
If you manage home servers, homelab equipment, or remote machines that occasionally lock up, a PiKVM is the difference between calling someone to press the reset button and handling it yourself in 30 seconds.
Hardware options compared
| PiKVM V4 Plus | PiKVM V4 Mini | DIY V2 (Pi 4) | |
|---|---|---|---|
| Price | ~$350 | ~$200 | ~$50–100 |
| Setup | Plug and play | Plug and play | Assembly required |
| Max resolution | 1920×1200@60Hz | 1920×1200@60Hz | 1920×1080@50Hz |
| HDMI passthrough | ✔ | ✖ | ✖ |
| ATX control | ✔ | ✔ | ✔ (DIY wiring) |
| Mass storage emulation | ✔ | ✔ | ✔ |
| OLED status display | ✔ | ✔ | ✖ |
| LTE option | ✔ | ✖ | ✖ |
Note: The Raspberry Pi 5 is not supported by PiKVM. It lacks GPU video encoders needed for H.64 capture. Stick with a Pi 4 (or Zero 2 W for the DIY route) for now.
Option A: PiKVM V4 (pre-built)
This is the fast path. If you just want a working KVM and don't mind spending a bit more, buy a V4 Plus or V4 Mini from an authorized reseller like PiShop.
1. Flash the microSD card
The PiKVM image comes pre-installed on the unit if you buy assembled. If you need to re-flash:
- Download the latest image from pikvm.org
- Open Raspberry Pi Imager
- Select "Use custom" and choose the PiKVM
.imgfile - Select your microSD card and click Write
2. Connect the hardware
For the V4 Plus:
- Plug the microSD card into the PiKVM
- Connect an HDMI cable from the target machine's video output to the PiKVM's HDMI input
- Connect the USB-A to USB-C cable from the PiKVM's OTG port to the target machine's USB port (this provides keyboard/mouse emulation)
- Connect Ethernet to your network (recommended over WiFi for reliability)
- Connect power — the V4 Plus uses a 12V/2A barrel jack (included) or USB-C
For the V4 Mini, the wiring is the same minus the passthrough and LTE ports.
3. Access the web interface
- Find the PiKVM's IP address on your network (check your router's DHCP client list, or use the OLED display on the V4)
- Open a browser and go to
https://<your-pi-kvm-ip>orhttp://<your-pi-kvm-ip> - Log in with the default credentials:
| Interface | Username | Password |
|---|---|---|
| Web UI | admin | admin |
| SSH/Terminal | root | root |
4. Change the default passwords (critical!)
This should be step one after your first login. Anyone on your network can access the web UI with factory defaults.
Click "Terminal" in the web interface, then:
# Enable write mode
rw

# Change the web interface password
kvmd-htpasswd set admin

# Change the root password
passwd

# Return to read-only mode (recommended)
ro
That's it — you should now see your target machine's screen in the browser. You can type, move the mouse, reboot the target, and even mount ISO images for OS installs.
Option B: DIY PiKVM V2
If you want to save money or enjoy building things (and who doesn't?), the DIY route gets you 90% of the features for a fraction of the price.
What you'll need
- Raspberry Pi 4 (2GB+ RAM) or Pi Zero 2 W
- HDMI capture device — one of:
- CSI bridge board (recommended — better quality, H.64 support)
- USB HDMI capture dongle (simpler, MJPEG only)
- USB-C Y-splitter cable (for power + data)
- HDMI cable
- microSD card (16GB+)
- ATX control components (optional — for power/reset button emulation)
1. Flash the PiKVM image
- Go to the PiKVM releases page
- Download the correct image for your hardware:
- Pi 4 + CSI bridge →
pikvm-v2-hdmi-rpi4-latest.img - Pi 4 + USB dongle →
pikvm-v2-hdmiusb-rpi4-latest.img - Pi Zero 2 W + USB →
pikvm-v2-hdmiusb-zero2w-latest.img
- Pi 4 + CSI bridge →
- Flash it with Raspberry Pi Imager or balenaEtcher
2. Wire the capture device
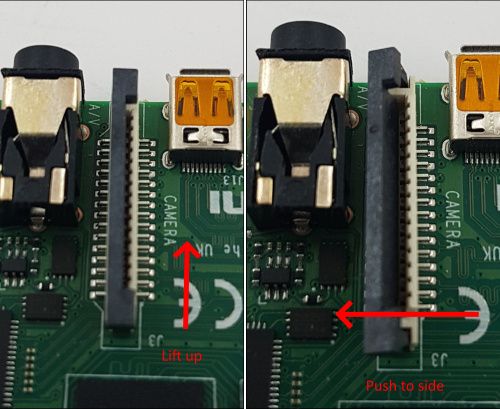
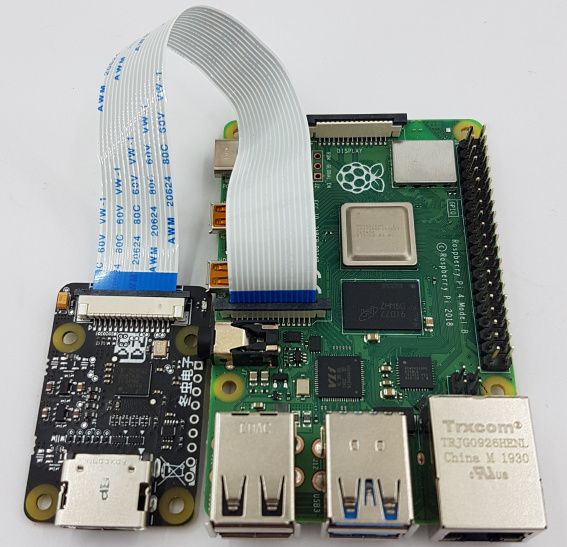
If using a CSI bridge:
- Connect the CSI bridge to the Pi 4's CSI/CSI-2 ribbon cable port
- Connect the bridge's HDMI input to the target machine
If using a USB dongle:
- Plug the dongle into the Pi 4's USB 3.0 port (blue)
- Connect an HDMI cable from the target machine to the dongle
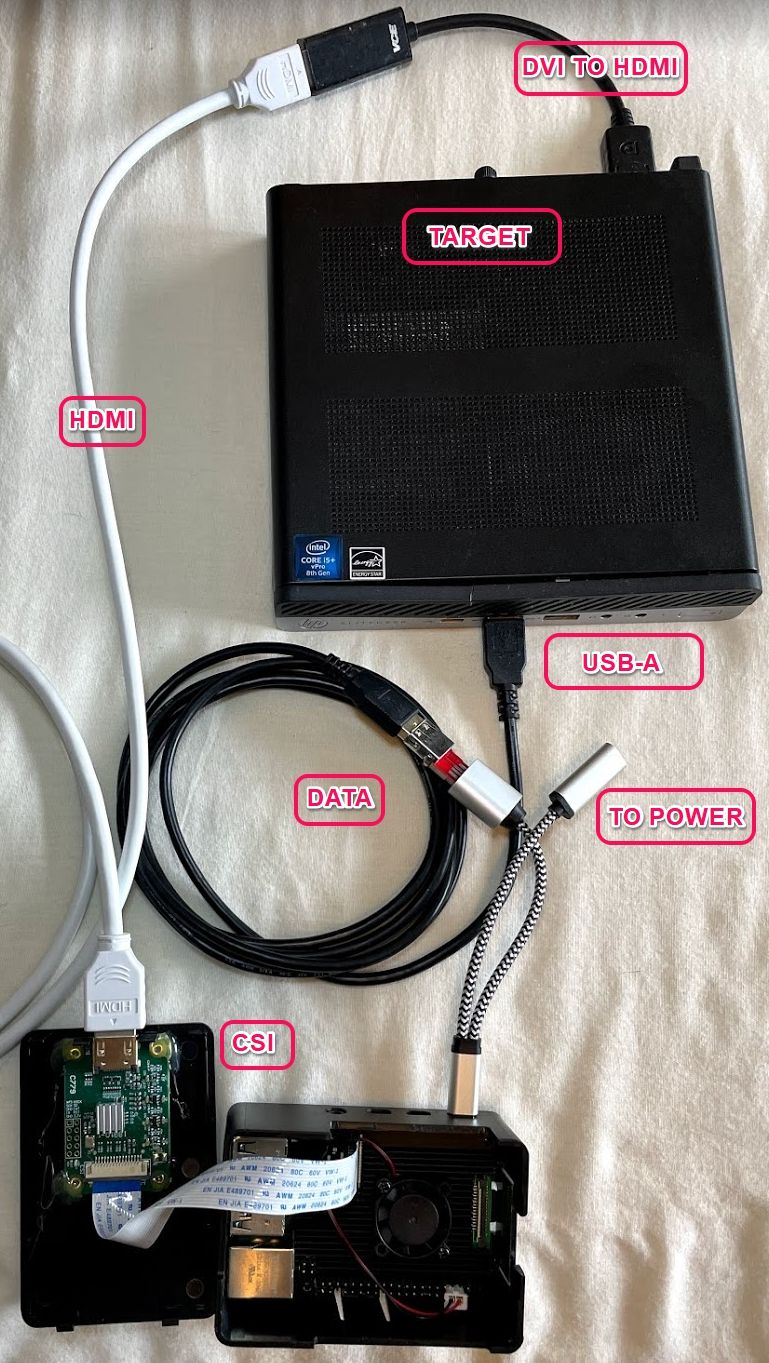
3. Connect USB emulation
- Use the USB-C Y-splitter: one leg goes to power, the other goes to the Pi's USB-C port
- Connect a USB-A to USB-A cable from the Pi's USB port to the target machine's USB port
- This is the channel that carries keyboard and mouse signals to the target
4. Connect to the network and boot
- Plug in Ethernet (strongly recommended) or configure WiFi
- Power on the Pi
- Find its IP on your network and open
http://<ip>in your browser - Change default passwords immediately (same procedure as Option A)
5. Upgrade the video quality (optional)
By default, the DIY V2 runs at 1920×1080@50Hz over MJPEG. If your BIOS screen works fine at 50Hz, you're good. For better compatibility:
- Edit
/boot/pikvm.txtto add:otg_roles=acm - Use the CSI bridge for H.264 encoding (smoother, lower bandwidth)
- Set
refreshin the PiKVM web UI to 60Hz if your capture device supports it
Advanced: Remote access over the internet
The PiKVM web UI works over your local network out of the box. To access it from outside your home, you have several options:
Tailscale (easiest)
PiKVM includes Tailscale support. This gives you a secure VPN connection to your KVM from anywhere.
- Open a terminal on the PiKVM
- Install Tailscale:
pacman -S tailscale-pikvm
systemctl enable --now tailscaled
tailscale up
- Follow the auth URL to link it to your Tailscale account
- Access the PiKVM web UI via its Tailscale IP from any device with Tailscale installed
Port forwarding (less recommended)
Forward port 443 (HTTPS) or 80 (HTTP) on your router to the PiKVM's IP. Change the default password first — exposing the web UI to the public internet with factory defaults is asking for trouble.
Scaling to multiple machines: the PiKVM Switch
Need to control more than one computer? The official PiKVM Switch Multiport Extender connects up to 4 (or more, with chaining) target machines to a single PiKVM head device.
Setup is plug-and-play:
- Connect target machines to the Switch ports via HDMI + USB
- Connect the Switch to the PiKVM head device
- Switch between machines from the web UI
Compatible with V4 Plus, V3, and DIY V1/V2. Not compatible with V4 Mini or Zero-based devices due to limited USB host ports.
Troubleshooting
"Video shows a black screen" → Verify the HDMI cable is connected to the correct port. Some GPUs don't output anything until the OS loads — the PiKVM can only capture what the GPU sends.
"Keyboard/mouse not working" → Check that the USB cable goes from the PiKVM's OTG port to the target. The HDMI capture and USB OTG are separate cables.
"Can't access BIOS" → The BIOS might only output at a resolution or refresh rate your capture device doesn't support. Try the CSI bridge if you're using a USB dongle. Make sure the HDMI cable is at least 30cm (some short cables have signal issues).
"Wi-Fi keeps disconnecting" → PiKVM is designed for Ethernet. WiFi is available but unreliable for KVM use — the video stream needs consistent bandwidth. Use Ethernet whenever possible.
Summary
| PiKVM V4 Plus | PiKVM V4 Mini | DIY V2 | |
|---|---|---|---|
| Best for | Production / datacenter | Budget plug-and-play | Tinkerers / tight budgets |
| Cost | ~$350 | ~$200 | ~$50–100 |
| Setup time | 10 minutes | 10 minutes | 1–2 hours |
| Max resolution | 1920×1200@60Hz | 1920×1200@60Hz | 1920×1080@50Hz |
| HDMI passthrough | ✔ | ✖ | ✖ |
| ATX control | ✔ | ✔ | DIY |
| LTE option | ✔ | ✖ | ✖ |
The PiKVM V4 route is the "I want it working now" path — you plug it in and you're done. The DIY route is the "I want to understand every cable and why it's there" path. Either way, you end up with a powerful remote access tool that makes software-only solutions look limited by comparison.
The biggest win: when a remote machine's OS crashes and you need to get into the BIOS or force a reboot, a PiKVM is there. A VNC connection never will be.